One way to introduce potential players to your game is to create a video. How many games outside of BYOND have you tried out just because you saw a video that looked really cool? Probably quite a few. You can make your game a lot more interesting not just by providing screenshots, but by creating a video to show it off.
The problem most people run into is that they don't know how to record a video. It's actually easier than you might think once you get into the swing of it, so this tutorial is meant to help you get started.
The tool we'll be using for this is Windows Media Encoder, which was already installed on my Windows XP system, but you can download it for free from Microsoft if you don't have it. You may not have it as a shortcut in your Start menu though. If it's not in your Start menu, you'll have to look for it. Open the Program Files folder and look for Windows Media Components, then the Encoder folder. There should be a file there called wmenc.exe. If you don't manage to find any of this, you may not have Windows Media Encoder installed; if so, download it and then open the program.

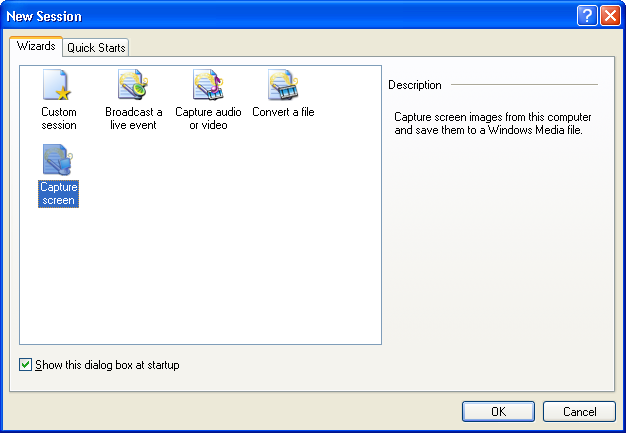
When you first open the program, a window will pop up that says "New Session". Select the "Capture screen" option. Before going further, fire up the BYOND game you want to capture in Dream Seeker. You might want to make sure the map is being displayed at regular 32×32 icon size without stretching, so you'll get the best video quality you can.


Back in the Windows Media Encoder window, tell it you want to capture a region of the screen, and get audio from the default device. Click Next. You'll see an icon that looks like a mouse pointer next to a box with a dotted outline. Click the icon and then drag your mouse cursor across the Dream Seeker map. When you're done, adjust the window region's coordinates so you're capturing an area 320 pixels wide, 240 pixels high (YouTube's standard format). Click Next.
Now you're asked to choose some other settings. Choose high quality, because chances are wherever you upload the video it will lose something in compression anyway. Click Next and just jump through the remaining options and finish. These don't matter much and anyway you'll need to do a little tweaking.


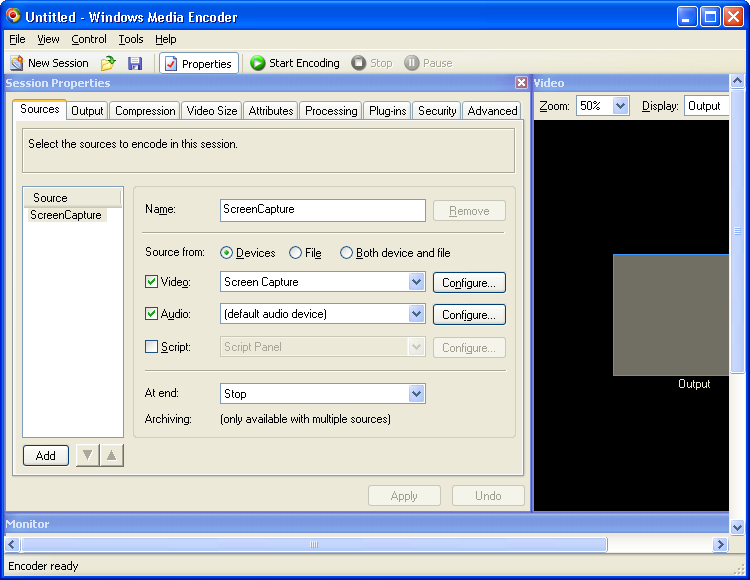
The New Session wizard should be gone now and you're left with the regular program window. Click on the Properties button just below the menu. The first tab you'll see is Source, which lets you change your video and audio if you need to. I found that I needed to change the audio from the default source to my sound card so I could capture audio, but if the game has ho sound or you want to set the clip to music, don't worry the audio. After you've made any changes you might need to, go to the Output tab. I recommend setting a maximum duration for your clip, like 5-10 minutes.

Go to the Compression tab and choose "File Archive" as the Destination. Pick the highest quality video, and high quality audio. You may be able to get along with less, but remember, most video websites are going to kill the video quality anyway after you upload, so it's worth trading off file size for better quality, at least until you're a lot more comfortable with the process. Later on you may discover settings that work better for you.

This part is very important for quality output. Go to the Processing tab and choose the Deinterlace option. I found in one of my games that I couldn't get good results without this setting.
Now, apply your changes to the properties and close the Properties box. Before moving on, go to the file menu and choose Save As..., and save your session as something like byond_video.wme. Whenever you need to record video in the future, you can just pop open this session and you'll be all set. (The next time, you may just need to change the screen capture region if your DS window is in a different place. To do this, go back to Properties, the Source tab, and click the Configure... button next to the video option.)
Make sure Dream Seeker is still right underneath the Windows Media Encoder window, and when you're ready, hit the Start Encoding button below the menu. Windows Media Encoder will pop down, so just start playing the game. Make sure your mouse is out of the way, since it'll show up in the video. Also, if you're recording audio, you might want to disable any sounds from instant messaging programs or what have you.
The video should stop when the time limit you set is up, but you can stop it yourself by going to the Windows Media Encoder window and clicking Stop.
When that's all done, you should have a .wmv file. Make sure you watch the clip to be sure it doesn't end up accidentally showing anything you don't want to or with any unwanted sounds. This will also let you verify the quality of the clip came out all right.
When it's all set, you can upload to YouTube under your own account. Don't forget to put the URL for your game on the video description so people can come play it! Once you've uploaded the video, you can edit your hub entry to use the YouTube video you've created, and you can submit the video to the BYONDtube group.
Now you may be wondering how to add music, overlay text, etc. There's a good chance your computer came with software for doing that; if not, there's Windows Movie Maker, but I don't recommend it for text. Editing videos is beyond the scope of this tutorial, but there are some good resources available online. Most editing software is relatively easy to use, so if you have an editor it couldn't hurt to play around with your video and see what you can do with it--but remember to make a backup copy first. When you get more comfortable with editors you can put in transitions, splice between several videos, and add special effects.