Please keep in mind, the integrity of the series may be undermined by the fact I'm absolutely horrible at graphics. Just be aware that where my graphics are terrible, hopefully, others wont be, and thus the tricks and tips that so very few people seem to know and use will not only help you advertise within BYOND, but also outside of BYOND.
First and foremost, let's look at at what most games that aren't taking advantage of the skins look like to the casual new user. To avoid offending users, I've recreated the look I get when I joined the better most of games.

As you can see, rushed appearance of my graphics aside, that is pretty poor. There's a lot of information on that which really doesn't need to be there. If I was some random new player who found your game outside of BYOND, I probably wouldn't give it the time of day. Let's break down what's wrong with it.
Unnecessary Stat() Tabs:
Let's face it, I haven't made or loaded a character yet. So there's absolutely no reason why I should be able to see it's name, race, inventory and other stats (hp, mp, exp etc). This stuff is utterly useless. Remove it.
Unnecessary Verbs:
Much like the stats, I'm not in a character, so I shouldn't have access to verbs like "Chop Wood" or even, "say". You can argue the OOC tab possibly, but to be honest, how many games have you played outside of BYOND that allow you communicate with the users before you've entered the game. None I'm aware of (there's probably a small few, but we're going with majorities here). This just looks tacky and, if you haven't actually protected any of your verbs from misuse, can lead to bugs in your games.
Load/Create/Delete/Quit Verbs:
These are buttons on the map itself. Completely pointless having these in view like that. You might as well have not included the splash screen itself, all it appears to be is a pretty (ugly...) face to an otherwise ugly layout.
So, let's work on improving this. Firstly, what does that interface screen actually have? A background picture and three buttons. Seems easy enough. To give you an example, we'll make this work in a new project, you can later adapt it to your own projects if you want.
So, make an interface file. We're given a set of default marcos, a default menu and a default window. The default window is where the tricky stuff is going to happen.
Setting up your default window:
- Rename the default window to window_default.
- Place a child control on very top left of the window, name it "child_main" and use the "Fill Window" button. Also set it's anchors to Top Left and Bottom Right.
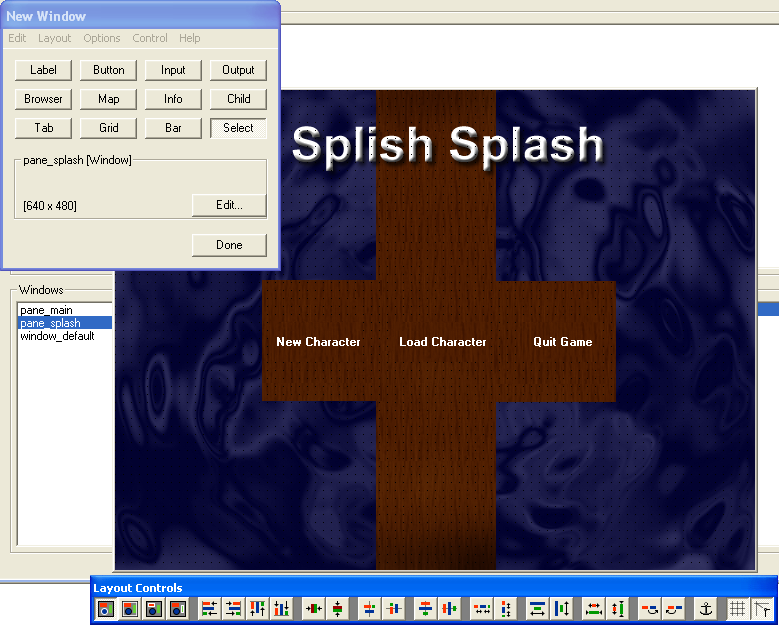
Now we have the basis of our main window done. Now we need to make two new windows in the interface, we're going to set them their ids "pane_splash" and "pane_main" respectively, do this now. Remember to check the "This is a pane" checkbox.
Setting up your splash pane:
- Edit the pane and set it's background image to our splash screen image.
- Add a button to the splash pane. Give it the ID "button_new_character" and set it's text to "New Character". Change the button type to "Push Box" and check the box "Flat". Then set it's command to "NewCharacter". Be sure to set any background images necessary.
- Copy the above button and past it two more times. Editing the values of the pasted buttons to "button_load_character", "button_load_quit" and add their respective text values and commands.
Setting up the main pane:
- Add an output control to the pane and set it's id "output_default" and check the "default" check box. Resize it to take up a majority of the window and set it's anchors to "Top Left" and "Bottom Right"
- Add an input control to the pane and set it's id to "input_default" and check the default check box. Resize it to take up the minority of the bottom of the pane and set it's anchors to "Bottom Left" and "Bottom Right".
Now we have our splash screen and main pane done.
Now it's time to write the code for this little beauty. We'll need two code files (well, one, but I believe in being neat). These will be named "datum_entry.dm" and "client". Each one reflects what they're going to contain. "datum_entry.dm" will contain the code to make this splash screen stuff work and "client.dm" will contain any code relating to the client.
To setup the code files, they'll look like this:
// client.dm
client
    New()
        . = ..()

// datum_entry.dm
player_entry
    verb
        NewCharacter()

        LoadCharacter()

        QuitGame()
For starters, we need to edit the client file so they can view the splash screen and set the proper window specifics as we want. To do this, we'll use winset(). For starters, we don't want the user to resize the window, nor do we want it to have a title bar, a status bar, any menus or any macros. We also want the user to have access to the verbs we made (or will make) for player entry.
This is all pretty basic stuff:
client
    New()
        . = ..()
        winset(src, null, {"
            window_default.child_main.left  = "pane_splash";
            window_default.can-resize       = "false";
            window_default.statusbar        = "false";
            window_default.titlebar     = "false";
            window_default.macro        = null;
            window_default.menu         = null
        "})
        src.verbs += typesof(/player_entry/verb)
Now we want to configure the datum_entry.dm to handle the logins of player mobs and whatnot. As well as change the splash screen. Character handling comes in Part 2 of this series, so we can pretty much skip this part and just use some generic interface altering code.
player_entry
    verb
        NewCharacter()
            generic_interface_changing_code(usr.client)

        LoadCharacter()
            generic_interface_changing_code(usr.client)

        QuitGame()
            del usr

proc
    generic_interface_changing_code(client/C)
        winset(C, null, {"
            window_default.child_main.left  = "pane_main";
            window_default.can-resize       = "true";
            window_default.statusbar        = "true";
            window_default.titlebar     = "true";
            window_default.macro        = "macro";
            window_default.menu         = "menu";
        "})
When this is executed, we get the following result:

Both the New Character and Load Character buttons do the same thing at the moment, mostly because I wanted to beak this tutorial up into parts.
Now you have a basic understanding of writing a splash screen in BYOND. Your tasks for the end of this lesson is a rather simple one: Centre the window. Who ever heard of a splash screen appearing in some random place on the users screen? As such, your job is to centre the window using whatever means you deem necessary and wherever you find necessary.
Part 2 will contain methods to handle character creation. For a clue at what I'm getting at, think of every game that uses input() to create characters, and imagine how much you hated that process.
If they do, we'll be able to see attractive, unseen skins rather than the usual skins.