BYOND's Game Development Tools
A BYOND game contains four kinds of files: code, icons, maps, and interfaces. BYOND's IDE, Dream Maker, contains editors for all of these files types. BYOND provides you with all of the tools you need to make a game, though you're able to use other tools if you'd like (ex: using Photoshop to edit icons).
These tools are very intuitive. The purpose of this guide isn't to explain how to use them - if you download BYOND and run Dream Maker you'll figure this all out in a few minutes. The purpose is to show you what BYOND provides and how simple it is to make a game. If you want to learn how these tools work, you should just download BYOND and start playing around.
Dream Maker
Here's a screenshot of Dream Maker. This shows the code editor, but the interface looks similar for all editors.
 Dream Maker's code editor.
The left side of the window contains two tabs, File and Object. The file tab lists all files in the project. When you double-click a file it's opened using the appropriate editor. These tabs are always visible. When you open an icon or map, the area showing the code here turns into the icon editor or map editor.
The code editor is pretty minimal. There are no tabs to list the files you have open, but each file you open is kept open when you switch to another. You have to double click on files in the File tab to switch, but when you do you'll be at the same position in the file. The code editor offers syntax highlighting but no form of autocomplete or code generation.
The Icon Editor
If you double click an icon file (a .dmi file), this is what you'll see:
![]() The icon editor.
The icon editor.
An icon is a collection of icon states. Each separate image there is its own named icon state. If you double click on an icon state, here's what you'll see:
![]() The icon state editor.
The icon state editor.
An icon state can be multi-directional and animated. This one has four directions and six frames of animation. If you double click on a frame, here's what you'll see:
![]() The image editor.
The image editor.
This is where you actually edit the image.
The Map Editor
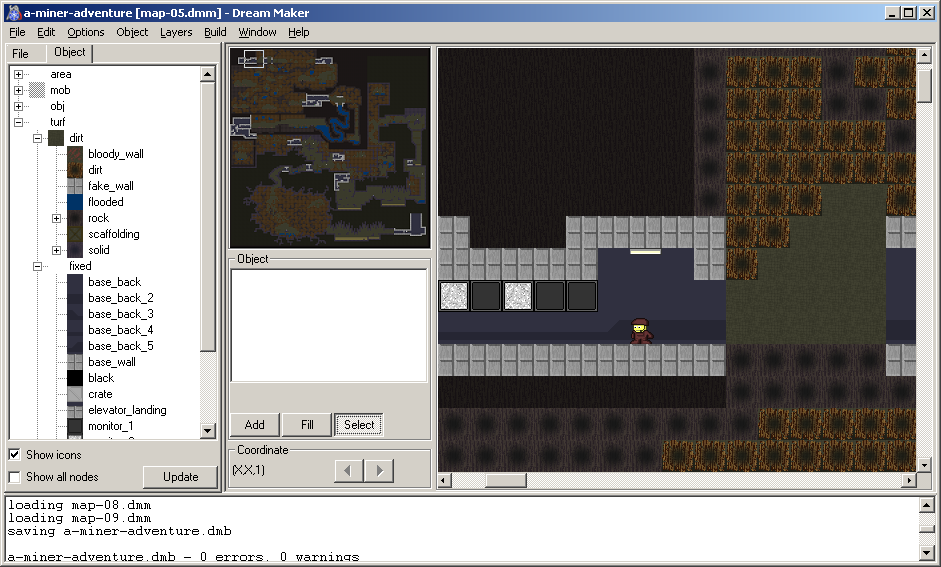
The map editor makes use of the Object tab. This tab lists all objects you've defined in the code. The tree has been expanded in the screenshot to show the types of turfs I've defined.
 The map editor.
The map editor has a minimap you can use to navigate and a larger area for editing the map. You select an object type from the tree on the far left and draw it in the map editor, just like a paint program. The map is composed of objects you've defined, so the map editor isn't the only way to change the map. If you update a turf type to change its icon, that change will be reflected in the map editor.
The Interface Editor
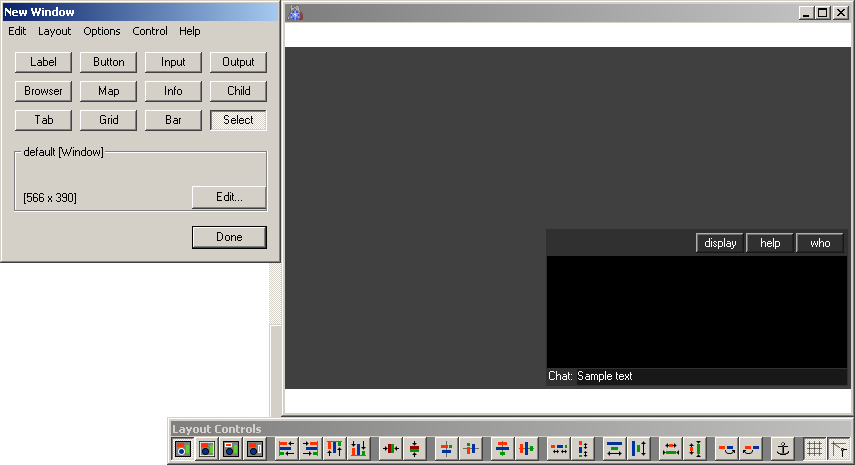
The interface editor is used to customize the game client used to play your game. If you're used to GUI editors like Visual Studio this might not look impressive, but it's basically the same deal. The menu on the left provides a list of interface controls you can place on the form (the large window in the top-right). The bar across the bottom contains buttons for performing operations on selected controls (centering, bring to front, etc.). You can also right click on a control to access a menu with more options.
 The interface editor.
Notes
The amount of development time you'll spend in each editor depends on the project. The project shown in these screenshots, A Miner Adventure, is pretty map-heavy. I spent most of my time in the map and code editors, a little bit of time in the icon editor, and hardly any time in the interface editor.
Click here to go back to the BYOND Whitepaper.